Interested in making a reversible tote bag that looks great from both sides? It’s easier than you think! Tote bags are practical, versatile, and perfect for carrying many items.
However, if you’re like many people, you may find a few too many tote bags lying around, and you’re looking for a way to switch things up.
That’s where a reversible tote bag comes in! By making your tote bag reversible, you’ll get two bags in one, and you can switch up the look of your bag in a snap.
In this guide, we’ll show you how to make a reversible tote bag that’s stylish and functional. So let’s get started!
What is a Reversible Tote Bag?
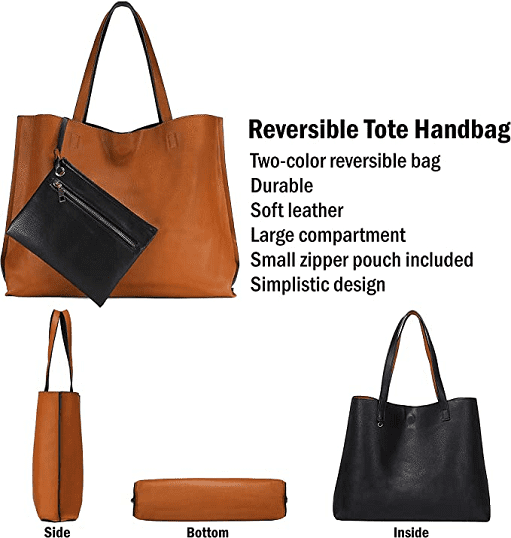
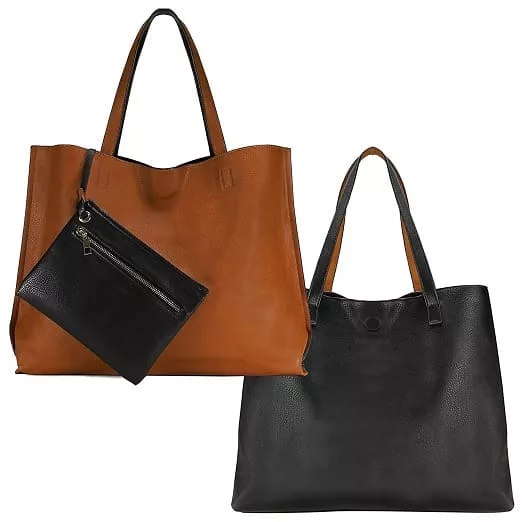
A reversible tote bag is a type of bag that you can use on either side. This means that both sides of the bag are functional, making it a versatile and practical accessory.
The bag is essentially two bags in one, as you can flip it inside out to reveal a different color or pattern. The fabrics used for the two sides of the bag can be different or the same.
This allows for various customization options to suit your style and needs. One of the benefits of a reversible tote bag is that it can be used for a variety of purposes.
The bag can be used as a shopping bag, a beach bag, a gym bag, or an everyday bag. It can also be easily folded and stored when not in use, making it a convenient accessory to have on hand.
How to Make a Reversible Tote Bag in 6 Easy Steps
Let’s start by showing you the materials you need.
Materials Needed
To create a reversible tote bag, you will need the following materials:
- 2 yards of fabric (1 yard for each side)
- Sewing machine
- Thread
- Pins
- Scissors
- Iron
- Ironing board
- Ruler or measuring tape
- Pen or fabric marker
Optional materials to personalize your bag:
- Fusible interfacing to add structure to the bag
- Pockets, zippers, or other closures
- Decorative elements like appliques or embroidery
Steps to Create a Reversible Tote Bag
1. Cut the fabric
- Cut two rectangles of equal size from each fabric for four rectangles.
- The size of the rectangles depends on how large you want your tote bag to be. A standard size is 16 inches wide and 14 inches tall.
- If you want to add pockets, cut them now from fabric scraps.
2. Sew the pockets (optional)
- Hem the top edge of the pocket piece by folding it over twice and sewing.
- Place the pocket on one of the main fabric rectangles and sew around the sides and bottom, leaving the top open.
- Repeat on the other main fabric rectangle.
3. Attach the main fabric rectangles
- Place the two main fabric rectangles right sides together and pin along the sides and bottom.
- Sew along the sides and bottom with a 1/2 inch seam allowance, making sure to backstitch at the beginning and end.
- Repeat on the other two fabric rectangles.
4. Box the corners
- Take one of the sewn fabric rectangles and fold it so that the side seam and bottom seam line up, creating a point at the corner.
- Measure 2 inches from the point along the seam and draw a line perpendicular to the seam.
- Sew along the line and trim the excess fabric.
- Repeat on the other three corners.
5. Turn the bag right side out.
- Turn one of the sewn rectangles right side out.
- Insert it into the other sewn rectangle so the right sides face each other.
- Pin around the top edge and sew, leaving a 4-inch gap for turning.
- Turn the bag right side out through the gap.
6. Finish the bag
- Press the bag, ensuring the seams are straight and the corners are squared.
- Topstitch around the top edge, closing the gap used for turning.
- Optional: add any decorative elements or closures to the bag.
Conclusion
Making a reversible tote bag is a fun and easy sewing project that can be customized to suit your style and needs. By following these simple steps and adding your personal touches, you can create a practical and stylish accessory that can be used for any occasion.